

Embarking on the journey of owning a home or managing your property means taking on a multitude of responsibilities, and one of the most crucial, yet often overlooked, is being vigilant about water leaks. These silent saboteurs can cause significant structural damage, foster mold growth, inflate your utility bills, and even pose safety hazards. But don’t let the thought of hidden leaks overwhelm you. This guide is specifically designed for beginners, equipping you with the knowledge and simple techniques to become your own first line of defense against water intrusion. You don’t need to be a plumbing expert or invest in costly equipment to make a real difference. With a little awareness and a few basic tools, you can confidently identify potential leaks and take action before they escalate into major problems. This article will walk you through the fundamental steps, from conducting simple home tests to understanding when it’s time to call in the professionals.
Water leaks, no matter how small, are more than just an inconvenience; they are a persistent threat to the integrity of your home and your wallet. Imagine a tiny drip from a pipe behind a wall. Over weeks and months, that single drip can saturate insulation, warp drywall, and create the perfect breeding ground for mold and mildew. This can lead to costly repairs, affecting not just the aesthetics of your home but also the air quality, impacting the health of you and your loved ones. Furthermore, water leaks contribute to an astonishing amount of wasted water. In the United States alone, it’s estimated that household leaks waste billions of gallons of water annually – the equivalent of watering 90 million homes! This not only strains our precious natural resources but also translates directly into higher water bills for you.
The Escalating Cost of Neglect
The longer a water leak goes undetected, the more severe and expensive the consequences become. A small, easily repairable drip can escalate into a burst pipe, leading to catastrophic damage that might require extensive demolition and structural work. Beyond the immediate repair costs, you’ll face the expense of drying out affected areas, replacing damaged materials, and potentially dealing with mold remediation. Think of it as a snowball effect: a minor issue, left unchecked, gains momentum and size, becoming a much larger and more challenging problem to control. Proactive detection significantly minimizes these escalating costs.
Health Implications of Unchecked Leaks
Beyond the structural damage, water leaks create an environment conducive to mold and mildew growth. These microscopic organisms can thrive in damp, dark spaces, and their spores can easily spread through your home’s ventilation system. For individuals with allergies, asthma, or compromised immune systems, exposure to mold can trigger serious respiratory problems, skin irritations, and other health issues. Recognizing the signs of a leak early can help prevent these harmful conditions from developing in the first place, safeguarding the well-being of everyone in your household.
Your First Line of Defense: Simple Home-Based Detection Methods
Before you even consider calling in a plumber, you possess the most crucial tools for water leak detection: your eyes, your ears, and your nose. Many leaks announce themselves through observable signs. Becoming familiar with these common indicators will empower you to spot problems early on. This isn’t about complicated diagnostics; it’s about paying attention to the subtle changes in your home that water damage can bring.
Visual Inspection: What to Look For
Your visual inspection should be thorough and systematic. Begin by walking through your home, paying close attention to areas where water is used or pipes are likely to be present.
Puddles and Water Stains
The most obvious sign of a leak is a visible puddle of water. However, leaks can also manifest as persistent dampness on floors, walls, or ceilings. Look for discoloration, rings, or water stains that appear where they shouldn’t. These marks can indicate a slow drip from above or a hidden seeping pipe. Don’t dismiss a small damp patch; it could be the first indication of a larger issue.
Bubbling or Peeling Paint and Wallpaper
When water seeps behind paint or wallpaper, it weakens the adhesive and causes the surface to bubble, peel, or blister. This is particularly common on walls and ceilings, especially in bathrooms, kitchens, and laundry rooms. The affected area might feel soft or spongy to the touch.
Warped or Discolored Drywall
Similarly, drywall can absorb moisture and begin to warp, sag, or become discolored. This can appear as a bulge in the wall or ceiling, or as a darkening of the material. In severe cases, the drywall might even start to crumble.
Mold and Mildew Growth
The presence of mold or mildew, often appearing as black, green, or white fuzzy or slimy patches, is a strong indicator of a persistent moisture problem. These are most commonly found in damp areas like bathrooms, basements, and around windows. Don’t just clean it; the underlying cause of the moisture needs to be addressed.
Unexplained Changes in Flooring
Wood flooring can warp, buckle, or cup when exposed to excess moisture. Carpets may become damp, discolored, or develop an unpleasant odor. Tile grout can become discolored or crumble. Any unusual change in the appearance or feel of your flooring warrants investigation.
Auditory Clues: Listening for Trouble
Leaks can also be heard. Sometimes, the sound of dripping or hissing is subtle, but with a keen ear, you can detect it.
The Persistent Drip, Drip, Drip
This is the classic sound of a leak. Listen carefully in areas where plumbing is present. You might hear a rhythmic dripping behind walls, under sinks, or under appliances. Even a slow, infrequent drip can lead to significant damage over time.
Hissing Sounds
A hissing sound can indicate a pressurized water line that has been compromised. This is often more subtle than a drip and can be mistaken for other noises. If you hear a consistent hissing, especially when no water is being actively used, investigate the source.
Olfactory Indicators: The Smell of Trouble
Your sense of smell can be a surprisingly effective tool for detecting hidden leaks.
Musty or Moldy Odors
A persistent musty or moldy smell, even in areas that appear dry, is a strong indicator of hidden moisture and potential mold growth. This odor is often more pronounced in enclosed spaces like cabinets, closets, or basements.
The Smell of Dampness
Beyond mold, you might simply detect a persistent smell of dampness or earthiness. This can suggest water is seeping into building materials and not evaporating efficiently.
The Go-To Test: Checking Your Water Meter
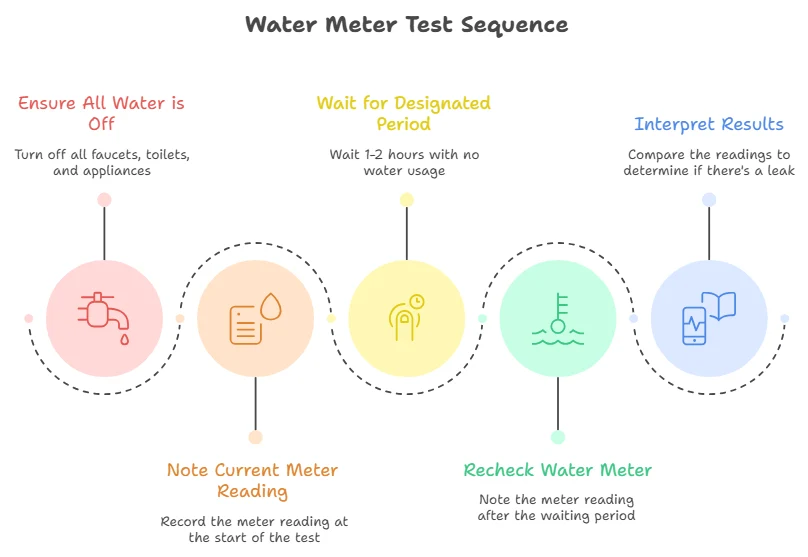
One of the most definitive ways to confirm whether you have a leak somewhere in your home is to perform a simple water meter test. This method leverages the fact that your water meter is designed to record the flow of water through your property. If water is flowing when it shouldn’t be, your meter will show it. This is a fundamental step that every homeowner should know how to perform.
Step-by-Step Meter Test: Your Leak-Proof Strategy
This test is straightforward and requires no special tools beyond your ability to read your water meter.
Step 1: Ensure All Water is Off
This is the most critical part of the test. You need to be absolutely certain that no water is being used anywhere in your home. This means turning off all faucets, flushing all toilets (ensuring they are not running continuously), and making sure that dishwashers, washing machines, and any other water-consuming appliances are completely shut off. Double-check to ensure that outdoor hoses are not dripping and that sprinkler systems are not running.
Step 2: Note Your Current Meter Reading
Locate your water meter. It’s usually found outside your home, often in a box near the street or property line, or sometimes in a basement or utility room. Your meter will have a series of numbers on a dial, similar to a car’s odometer. Carefully record the exact reading at this moment. Write it down on a piece of paper or, even better, take a clear photograph of the meter dial with your phone for future reference.
Step 3: Wait for a Designated Period
Now, you need to wait. The recommended waiting period is typically between 1 to 2 hours. During this time, absolutely no water should be used inside or outside your home. Again, resist the urge to flush a toilet or run a tap. This waiting period allows any residual water pressure to dissipate and ensures that any moving parts within the meter are still.
Step 4: Recheck Your Water Meter
After the waiting period has elapsed, return to your water meter. Carefully note the new reading. Compare this new reading to the one you recorded earlier.
Step 5: Interpret the Results
- If the water meter reading has not changed: Congratulations! You likely do not have a significant, active water leak within your plumbing system.
- If the water meter reading has changed (even by a small amount): This is a strong indication that there is a leak somewhere in your home’s plumbing system or fixtures. The fact that the meter moved without any water being intentionally used means that water is escaping.
What to Do If Your Meter Indicates a Leak
If your water meter test reveals a leak, don’t panic. This information is valuable because it tells you that action is needed. Your next step should be to systematically investigate potential leak sources. Start with the most common culprits, such as toilets, sinks, and appliances.
Essential Tools for the Beginner Leak Hunter
You don’t need a toolbox full of professional gear to start detecting leaks. A few simple, readily available items can significantly enhance your ability to pinpoint the source of water intrusion. These tools are inexpensive and easy to use, making them perfect for beginner leak hunters.
The Basic Kit: Your Leak Detection Arsenal
Having these items on hand will make your investigations much more effective.
- Flashlight: A good quality flashlight is indispensable. Many leaks occur in dark, hard-to-reach places like under sinks, behind appliances, or in crawl spaces. A strong beam will help you see water stains, corrosion, or moisture that might otherwise go unnoticed.
- Food Coloring (for Toilets): This is a clever and easy way to check for silent leaks in your toilet tank. A few drops of food coloring are all you need.
- Moisture Meter: While not strictly “essential” for the most basic checks, a moisture meter is an incredibly useful tool for beginners. It can detect moisture levels in walls, floors, and ceilings that might not be visible to the naked eye, offering a more definitive assessment of dampness. They are readily available online and in home improvement stores.
Beyond the Basics: When to Consider Smart Sensors
For added peace of mind and immediate alerts, consider investing in smart water leak sensors. These innovative devices have become increasingly affordable and user-friendly, offering a proactive approach to leak detection.
How Smart Sensors Work: Instant Alerts at Your Fingertips
Smart sensors are small, battery-powered devices that you place in areas prone to leaks. When they detect water, they send an instant alert to your smartphone via a dedicated app. This notification allows you to respond to a leak within minutes, significantly reducing potential damage. They are a fantastic addition to your home’s safety net, especially for busy households or those who travel frequently.
Strategic Placement for Maximum Protection
The effectiveness of smart sensors depends on their placement. Aim to install them in areas where leaks are most likely to occur or cause the most damage.
- Under Sinks: Place sensors under kitchen and bathroom sinks, near the P-trap and supply lines.
- Near Toilets: Position sensors on the floor behind or beside your toilets, especially in bathrooms with older plumbing.
- Near Water Heaters: Water heaters are a common source of leaks, so place a sensor in the drip pan (if applicable) or on the floor nearby.
- Laundry Rooms: Install sensors near washing machines and the water supply hookups.
- Basements and Crawl Spaces: If you have these areas, place sensors in low-lying spots or near potential pipe entry points.
Dealing with Stubborn Leaks: Advanced Methods and Professional Help
| Types of Water Leak Detection | Pros | Cons |
|---|---|---|
| Passive Leak Detection | Low cost, easy to install | May not detect small leaks |
| Active Leak Detection | Quickly detects leaks, can shut off water supply | Higher cost, more complex installation |
| Appliance-Specific Leak Detection | Targeted detection for specific appliances | Limited coverage |
While the basic home-based methods and smart sensors can catch many leaks, some are more elusive. These hidden leaks, often within walls or underground, require more advanced detection techniques. In these cases, it’s wise to know when to seek professional assistance.
Advanced Detection for Hidden Leaks
Plumbers and specialized leak detection services possess advanced equipment and expertise to locate leaks that are not readily apparent.
- Acoustic Correlators for Underground Pipes: For leaks in underground water lines, plumbers use acoustic correlators. These devices listen for the distinctive sound of escaping water and can pinpoint its location with remarkable accuracy.
- Thermal Imaging: Thermal imaging cameras detect temperature differences. Water leaks, especially those involving hot water or significant cold water flow, can alter the temperature of surrounding materials like walls or ceilings. A thermal camera can reveal these temperature anomalies, indicating the presence and general location of a leak.
Detection Table Highlights: A Quick Reference
While not something you’ll typically perform yourself as a beginner, understanding these methods highlights the capabilities of professionals:
- Ultrasonic + Moisture Meter for Wall Supply Lines: Professionals might use ultrasonic devices to listen for faint sounds within walls, combined with moisture meters to confirm dampness, to pinpoint leaks in supply lines concealed within walls.
- Thermal Imaging for Drywall Moisture: As mentioned, thermal imaging is excellent for visualizing moisture within drywall by detecting temperature variations caused by the dampness.
When to Call a Professional: Recognizing Your Limits
As a beginner, your goal is to be proactive and catch leaks early. However, some situations are beyond the scope of DIY investigation.
- Persistent High Water Bills Despite No Visible Leaks: If your water meter test indicates a leak, and you’ve performed all the basic checks without success, it’s time to call a professional.
- Suspected Leaks Behind Walls or Under Floors: If you see signs of water damage on your walls or ceilings, but can’t visually identify the source, it’s likely a hidden leak.
- Underground Pipe Leaks: These are almost always the domain of professionals who have the specialized equipment to locate them.
- Anytime You Feel Unsure or Uncomfortable: Your home is a significant investment. If you suspect a leak and are unsure how to proceed, it’s always better to call a qualified plumber. They have the experience and tools to diagnose and repair the issue safely and effectively.
Best Practices for Ongoing Leak Prevention
Water leak detection isn’t a one-time task; it’s an ongoing practice that should be integrated into your home maintenance routine. By adopting these best practices, you can significantly reduce your risk of experiencing water damage.
Regular Inspections: Vigilance is Key
Make it a habit to conduct regular visual and auditory checks of your home. It doesn’t need to be a lengthy process.
Simple Checks You Can Do Monthly
- Walkthrough: Dedicate a few minutes each month to walk through your home and look for anything unusual.
- Listen: Pay attention to any new sounds, especially dripping or hissing.
- Smell: Be aware of any persistent musty or damp odors.
- Check Visible Pipes: Briefly inspect any exposed pipes under sinks or in basements for signs of corrosion or drips.
Smart Sensor Maintenance: Keeping Them Primed
If you’ve invested in smart water leak sensors, ensure they are functioning optimally.
Calibration and Battery Checks
- Install Sensors Correctly: Ensure sensors are placed approximately 6 inches above the floor for optimal detection, as water tends to pool at lower levels.
- Calibrate Regularly: While many are self-calibrating, it’s a good practice to periodically test them. You can do this by carefully placing a small amount of water near the sensor (without over-saturating it) and verifying that you receive an alert.
- Check Batteries: Most smart sensors are battery-powered. Check the battery life indicator on the app or the sensor itself and replace batteries as needed. This ensures your alerts are always timely. Many manufacturers recommend checking and replacing batteries every 6-12 months, depending on usage and battery type.
Educate Your Household: Everyone’s Responsibility
Make sure everyone in your household understands the importance of water conservation and leak detection.
- Report Unusual Signs: Encourage children and other family members to report any wet spots, strange noises, or unusual smells they notice.
- Turn Off Faucets Tightly: Simple habits like ensuring faucets are turned off completely can prevent minor drips.
By incorporating these best practices into your homeownership journey, you’ll be well-equipped to prevent leaks from becoming major problems, saving you time, money, and stress in the long run. Remember, your vigilance is the most powerful tool you have in the fight against water leaks.
FAQs
What are the common signs of a water leak in a home?
Some common signs of a water leak in a home include unexplained increases in water bills, damp or wet spots on walls or ceilings, the sound of running water when no fixtures are in use, and mold or mildew growth.
How can I check for water leaks in my home?
You can check for water leaks in your home by monitoring your water meter for unexplained increases, inspecting visible pipes and fixtures for signs of leaks, and using a water leak detection device to identify hidden leaks.
What should I do if I suspect a water leak in my home?
If you suspect a water leak in your home, it’s important to locate and repair the leak as soon as possible to prevent further damage. You may need to contact a professional plumber to help locate and repair the leak.
What are some common causes of water leaks in a home?
Common causes of water leaks in a home include damaged or corroded pipes, loose or worn-out fittings, high water pressure, and clogged drains or sewer lines.
How can I prevent water leaks in my home?
To prevent water leaks in your home, you can regularly inspect and maintain your plumbing system, monitor your water usage for any unexplained increases, and address any plumbing issues promptly.


