

You’re trying to wash your hands, and the water dribbles out. You turn on the shower, and it feels more like a drizzle. Low water pressure in your home can be a persistent, frustrating problem, turning simple daily tasks into an exercise in patience. It’s not just annoying; it can also be a sign of a more significant issue lurking within your plumbing system. You’re not alone in experiencing this; countless homeowners grapple with the mystery of where their water pressure has gone. This article will equip you with the knowledge to diagnose the root causes of your home’s low water pressure and guide you through the most effective fixes, from simple DIY solutions to when you’ll absolutely need to call in the professionals.
Before you can fix something, you need to understand how it works. In your home, water pressure is essentially the force that pushes water through your pipes and out of your faucets, showerheads, and appliances. This force is typically supplied by your local municipality if you’re connected to a public water system, or by a well pump if you have a private well.
The Ideal Pressure Range
The ideal water pressure for a residential home typically falls between 40 and 60 pounds per square inch (psi). While some systems can handle slightly higher pressures, anything consistently below 40 psi is often considered low, and exceeding 80 psi can put undue stress on your plumbing. You can easily check your home’s water pressure using a simple water pressure gauge, which you can find at most hardware stores. You’ll screw this gauge onto an outdoor hose bib or a laundry room faucet. With the water off, the gauge will show you the static pressure. With the water running, you can see the dynamic pressure, which is what you’re experiencing at your fixtures.
Common Symptoms of Low Water Pressure
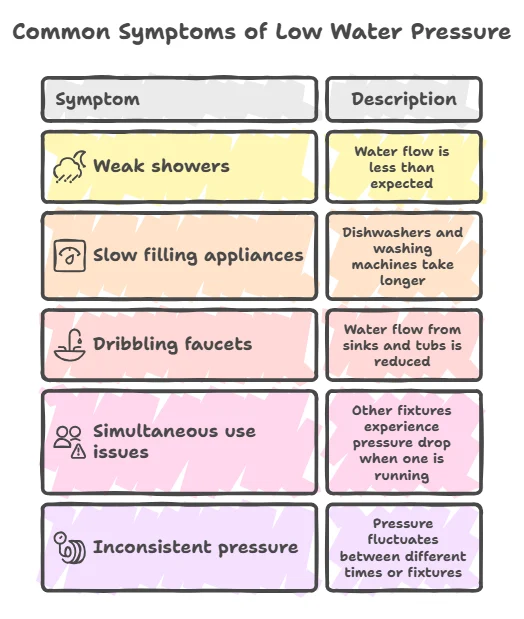
You likely already know you have a problem if you’re experiencing these symptoms:
- Weak showers: The most common and often most irritating symptom.
- Slow filling appliances: Dishwashers and washing machines taking longer to fill.
- Dribbling faucets: Water flow from sinks and tubs is noticeably reduced.
- Simultaneous use issues: When one fixture is running, others experience an even more significant drop in pressure (though this can also be indicative of other problems).
- Inconsistent pressure: Pressure fluctuates between different times of the day or different fixtures.
Understanding these symptoms is your first step in pinpointing the issue. Now, let’s dive into the potential culprits.
The Aerator and Fixture Obstructions: The Simplest Fixes
Often, the most straightforward problems have the simplest solutions. Before you start contemplating major plumbing overhauls, check the very end points of your water delivery system: your fixtures. These are the taps, showerheads, and even the little nozzles on your faucets.
Clogged Aerators: The Tiny Culprit in Your Faucet
Your faucets have small, screw-on attachments at the tip called aerators. These are designed to mix air with water, creating a smoother, splash-free stream. However, over time, mineral deposits, sediment, and other debris can build up inside these aerators, significantly restricting water flow. This is especially common in areas with hard water, where mineral content is high.
How to Fix:
- Unscrew the aerator: Most aerators can be unscrewed by hand. If it’s stuck, you might need a pair of pliers with some cloth or tape to protect the finish.
- Soak it in vinegar: Once removed, submerge the aerator in a small bowl of white vinegar. Let it soak for at least 30 to 60 minutes. Vinegar is excellent at dissolving mineral buildup. For very stubborn clogs, you might need to soak it longer, or even overnight.
- Scrub and rinse: After soaking, use an old toothbrush or a small brush to scrub away any remaining debris. Rinse the aerator thoroughly under running water.
- Reinstall: Screw the clean aerator back onto the faucet.
- Test: Turn on the faucet to see if the water pressure has improved.
Clogged Showerheads: The Same Principle, Different Location
Your showerhead, much like your faucet aerators, can also become clogged with mineral deposits. The small nozzles can get blocked, leading to that disappointing, weak shower.
How to Fix:
- Remove the showerhead: Most showerheads can be unscrewed by hand. If it’s a bit stiff, you might need an adjustable wrench, again using a cloth to protect the finish.
- Soak in vinegar: Place the showerhead in a plastic bag filled with white vinegar. Secure the bag around the showerhead arm with a rubber band or zip tie, ensuring the entire showerhead is submerged. Leave it to soak for several hours, or ideally overnight.
- Scrub and clean: After soaking, remove the bag and use a small brush or an old toothbrush to gently scrub the nozzles and dislodge any loosened mineral deposits. You can also use a toothpick to poke into the nozzles if needed.
- Rinse and reattach: Rinse the showerhead thoroughly with hot water. Screw it back onto the shower arm.
- Test: Turn on the shower to check for improved water flow.
These are often the first and easiest checks you can perform. If cleaning your aerators and showerheads doesn’t solve the problem, you’ll need to investigate further down the line.
Leaking Pipes: The Silent Water Thief
One of the most common, and potentially damaging, causes of low water pressure throughout your entire home is a hidden leak somewhere in your plumbing system. Water has a way of finding the path of least resistance, and if there’s a crack or break in a pipe, water can be escaping before it even reaches your fixtures.
Identifying a Leaking Pipe
This can be one of the trickiest issues to diagnose because, by its nature, a leak might be out of sight, behind walls, under floors, or even underground. However, there are several telltale signs to watch for:
- Unexplained Wet Spots: Look for consistently damp or discolored patches on walls, ceilings, or floors. Even if they seem small, they could indicate a slow, persistent leak.
- The Sound of Water: Listen carefully for dripping or running water sounds when no fixtures are in use. This is a classic sign of a leak.
- Mold and Mildew Growth: Persistent moisture can lead to the growth of mold and mildew, which often have a musty odor and can be visible as dark spots or patches.
- Peeling Paint or Wallpaper: Water seeping behind these coverings can cause them to bubble, peel, or blister.
- High Water Bills: A sudden, significant increase in your water bill, especially if you haven’t changed your water usage habits, is a strong indicator of a leak.
- Decreased Water Pressure: As mentioned, water escaping from a damaged pipe means less water is available for your intended use, leading to a noticeable drop in pressure.
- Foundation Cracks: In severe cases, underground leaks can saturate the soil around your foundation, leading to settlement and cracks.
What to Do About Leaking Pipes
If you suspect a leak, act immediately. Leaks can cause significant structural damage, promote mold growth, and waste a tremendous amount of water.
- Isolate the leak (if possible): If you can pinpoint the general area of the leak, you might be able to shut off the water supply to that specific zone or fixture.
- Contact a Plumber: Unless you have extensive plumbing experience and the leak is very minor and easily accessible, it’s best to call a professional plumber. They have the tools and expertise to locate hidden leaks using methods like acoustic listening devices or thermal imaging and to repair them effectively.
- Turn off your main water supply: If you cannot isolate the leak and it appears to be significant, or if you’re going to be away from home, it’s crucial to shut off your main water supply valve to prevent extensive damage. This valve is typically located where the water line enters your home, often in the basement, utility closet, or near the water meter.
Ignoring a leak is never a good idea. It’s a problem that will only get worse and more expensive to fix over time.
The Faulty Pressure Reducing Valve (PRV): The Gatekeeper of Your Pressure
Many homes, especially those connected to municipal water supplies, are equipped with a Pressure Reducing Valve (PRV). This device is crucial for safeguarding your plumbing system. Municipal water pressure can sometimes be quite high, and if it’s not regulated, it can overwhelm your pipes, fixtures, and appliances, leading to leaks and premature wear. The PRV’s job is to reduce this incoming pressure to a safe and manageable level for your home.
Why PRVs Fail
PRVs are mechanical devices and, like any mechanical part, they can wear out over time. Common reasons for PRV failure include:
- Age and Wear: PRVs typically have a lifespan of about 10 to 15 years. After this, their internal components can corrode or become loose, leading to reduced effectiveness.
- Debris and Sediment: Over time, sediment or debris from the municipal water supply can accumulate within the PRV, clogging its internal workings and disrupting its ability to regulate pressure.
- Improper Installation: If a PRV was not installed correctly in the first place, it may not function as intended, leading to low or fluctuating pressure.
- Physical Damage: Although less common, the valve could have been damaged during other plumbing work.
Recognizing a Failing PRV
A failing PRV will often exhibit the following signs:
- Consistently Low Pressure: If you’ve checked your aerators and ruled out leaks, and your water pressure is consistently low across all fixtures, the PRV is a prime suspect.
- Complaints from Neighbors: If your neighbors are also experiencing low water pressure, it might indicate an issue with the municipal supply or a problem with the PRV at the point where the water enters your property.
- Fluctuating Pressure: A PRV that is starting to fail might cause pressure to sporadically drop or surge.
- Symptoms of High Pressure Elsewhere: Ironically, sometimes a PRV that is stuck in the “open” position can allow high pressure to enter your home, leading to increased risks of leaks and appliance damage. However, if it fails by becoming restricted, it will cause low pressure.
- Audible Hissing or Humming: Sometimes, a failing valve might make unusual noises.
Testing and Replacing Your PRV
- Test the pressure: The most definitive way to determine if your PRV is the issue is to test your water pressure with a gauge after the PRV. This valve is typically located where your main water line enters your home, often near the water meter or main shut-off valve. You should see a significant drop in pressure if the PRV is working correctly, reducing the higher municipal pressure to your home’s acceptable range. If you’re testing and the pressure is still low after the valve, it’s likely faulty.
- Professional Replacement: Replacing a PRV is not typically a DIY job for the average homeowner. It requires shutting off the main water supply, cutting and re-piping sections of your water line, and ensuring proper connection and adjustment of the new valve. It’s strongly recommended to hire a qualified plumber for this task. They can ensure the new PRV is correctly installed and set to the appropriate pressure for your home, usually between 40-60 psi.
Partially Closed Valves: The Simple Oversight
If you’re connected to a city or town water system, there are several reasons why you might be experiencing low pressure:
- High Demand: During peak usage times (like mornings and evenings), especially in densely populated areas or during hot weather when everyone is using water for irrigation, the overall demand on the municipal system can outstrip its capacity, leading to temporary drops in pressure for individual homes.
- Main Line Issues: The municipal water department might be experiencing problems with their main water lines, such as breaks, repairs, or a need to lower pressure due to maintenance.
- Water Treatment or Storage: Issues at water treatment plants or low levels in water storage tanks can also affect pressure.
- Reduced Pressure Zones: Some municipal systems are divided into pressure zones. It’s possible you are in a lower-pressure zone, or there might be an issue with a pressure-regulating station serving your area.
What to Do:
- Check with Neighbors: The first step is to ask your immediate neighbors if they are experiencing similar low-pressure issues. If they are, it strongly suggests a problem with the municipal supply.
- Contact Your Water Utility: Reach out to your local water company or public works department. They can inform you about any known issues in your area, planned maintenance, or whether there are general pressure concerns.
Well Water Supply Issues
If you rely on a private well, low water pressure can be caused by problems with the well system itself:
- Failing Well Pump: The well pump is responsible for pushing water from the well up into your home’s plumbing system. If the pump is old, damaged, or not functioning correctly, it won’t be able to generate sufficient pressure.
- Symptoms: Gradual or sudden loss of pressure, the pump making unusual noises, the pump switching off prematurely, or no water at all.
- Issues with the Pressure Tank: Your well system likely includes a pressure tank, which stores water and helps maintain consistent pressure. If the tank’s bladder is damaged or the air charge is depleted, it can lead to fluctuating or low pressure.
- Clogged Well Screen or Piping: Sediment or debris can accumulate in the well screen, at the bottom of the well, or within the intake pipes, restricting the flow of water from the well into the pump.
- Low Water Table: In times of drought or increased local water usage, the water table can drop, making it harder for the pump to draw sufficient water.
What to Do:
- Check the Breaker: Ensure the circuit breaker for your well pump hasn’t tripped.
- Inspect Visible Components: Check the pressure tank for obvious signs of damage.
- Listen to the Pump: Pay attention to any unusual sounds coming from the well area.
- Contact a Well Specialist: Diagnosing and repairing well systems requires specialized knowledge and equipment. It’s best to call a qualified well pump technician or drilling company. They can test your pump, check your pressure tank, inspect the well itself, and recommend the necessary repairs, which might include replacing the pump, repairing the pressure tank, or cleaning the well.
Understanding whether the problem originates externally – from the municipality or your well system – is crucial for knowing where to direct your troubleshooting efforts.
Peak Usage and Faulty Fixtures: Overload and Wear
Even if your plumbing is in good condition, your water pressure can still be affected by how and when you use your water, as well as by individual fixtures that are no longer performing optimally.
The Impact of Peak Usage
- Overloading the System: Your home’s plumbing is designed to handle a certain volume of water flow. When multiple high-demand fixtures or appliances are operating simultaneously, they can collectively exceed the system’s capacity, leading to a temporary but noticeable drop in pressure at all points of use.
- Examples: Running the washing machine, taking a shower, and flushing a toilet all at the same time are common scenarios that can strain your water pressure.
- Seasonal Demand: As mentioned in the municipal supply section, high usage during summer months for irrigation can exacerbate pressure issues, even if your internal plumbing is fine.
How to Manage Peak Usage Issues:
- Stagger Appliance Use: Try to avoid running multiple high-water-demand appliances (like dishwashers, washing machines, and lawn sprinklers) concurrently. Staggering their usage can help maintain more consistent pressure.
- Conscious Water Use: Be mindful of your water consumption during peak hours, especially if you live in an area with known pressure fluctuations.
Faulty Fixtures Beyond Aerators
While clogged aerators are a primary culprit among fixtures, other issues can also contribute to low perceived pressure:
- Worn-Out Fixture Valves: The internal components of older faucets and shower valves can wear out over time. This wear can lead to internal leaks or blockages within the valve itself, impeding water flow even if the pipes leading to it are fine.
- Damaged Supply Lines: The flexible hoses that connect your fixtures (like toilets and sinks) to the shut-off valves can become kinked or damaged. A kink in the hose acts like a bottleneck, restricting water flow.
- How to check and fix: Visually inspect the flexible supply lines under your sinks and behind your toilet. Straighten any kinks if possible. If a line appears damaged, cracked, or is consistently kinked, it’s best to replace it. This is a relatively simple DIY task, but ensure you turn off the water supply to the fixture before attempting replacement.
- Problematic Shower Diverters: If you have a bathtub with a shower, the diverter that switches water flow from the tub spout to the showerhead can become clogged or faulty, leading to reduced pressure at the showerhead.
What to Do:
- Inspect Fixtures: If you notice consistently low pressure at only one or a few fixtures, examine those specific fixtures.
- Clean or Replace Fixtures: If cleaning aerators and showerheads doesn’t help, and you suspect the fixture itself is the problem, consider replacing the entire faucet or shower valve. This is a more involved DIY project or a job for a plumber.
- Check Supply Lines: For flexible supply lines, a visual inspection is usually sufficient. If they’re kinked, try to straighten them gently. If damaged, replace them.
By systematically addressing each potential cause, from the simplest fixture cleaning to investigating external supply issues, you can effectively diagnose and resolve low water pressure in your home, restoring your comfort and convenience.
FAQs
What are the common causes of low water pressure in a home?
Some common causes of low water pressure in a home include clogged pipes, water leaks, mineral buildup in pipes, and issues with the municipal water supply.
How can clogged pipes contribute to low water pressure?
Clogged pipes can restrict the flow of water, leading to low water pressure. This can be caused by mineral buildup, debris, or sediment accumulating in the pipes over time.
What are some potential fixes for low water pressure in a home?
Potential fixes for low water pressure in a home include checking for leaks, cleaning or replacing clogged pipes, installing a water pressure booster pump, and contacting the local water utility company to address any issues with the municipal water supply.
How can mineral buildup in pipes affect water pressure?
Mineral buildup in pipes, also known as limescale, can restrict the flow of water and lead to low water pressure. This is a common issue in areas with hard water.
When should I consider contacting a professional plumber for low water pressure issues?
If you have tried basic troubleshooting steps and are still experiencing low water pressure, it may be time to contact a professional plumber. They can assess the situation, identify the root cause of the issue, and recommend the best course of action for resolving it.


